Building and using a greenhouse
The purpose of (and benefits to) a greenhouse (or "hoop house"
or "high tunnel") in gardening is to:
- Control the climate.
- Control humidity. Plants like humid conditions. Unfortunately, so
do diseases.
- Control bugs and weeds.
- Yield higher quality and larger produce.
- Grow produce year round.
My Greenhouse (in planning stages)
- Dimensions: A 32' x 10' (320-sqft) solar-style greenhouse design.
- Items not included (yet);
- Side walls. Framed with lumber and covered with greenhouse film.
- Shade cloth (summer use). 32' x 10'
- Miscellaneous screws, nails, braces, paint, zip ties, etc.
- Roof:
- Cattle panels frame. 8-each 16-feet by 52-inch. Cost $200 ($25/each)
- Greenhouse film. Agtec Super Strength Clear Woven Greenhouse Film 12mil. RPE (reinforced polyethylene), UV Stabilized, retains 80% strength after 7 years, 82% light transmission. For a 32' x 16' coverage the cost is approximately $150 + shipping.
- Thermal blanket (winter use). 32' x 16' or 512 sqft. 10-each queen-sized fleece blankets sewn together. King-sized (7.5' x 8.5' or 63.75 sqft) fleece blanket at Walmart, cost $180 ($18/each).
- Total cost: $530 (i.e. 200 + 150 + 180)
- Frame: Use pressure treated lumber, torched black.
- 4-ft posts (south wall). 9-each 4x4 by 4-ft. Use 5-each 8-foot and cut in half. Cost $60 ($12/each)
- 4-ft posts (north wall). 9-each 4x4 by 4-ft. Use 4-each 8-foot and cut in half. Cost $48 ($12/each)
6-ft posts. 9-each 4x4 by 6-ft. Cost $72 ($8/each)- 2x4 lumber. 16-each 2x4 by 8-ft lumber. Cost $96 ($6/each)
- Total cost: $204.
- Insulation: Create a wall panel unit consisting of a middle foam board, an inner OSB (thin plywood) panel, and an outer plywood panel.
- Dimensions (south wall): 2'x32'
- Dimensions (north wall): 4'x16'. Note: The other 16-feet consists of the thermal wall.
- Foam board: 4-each 4'x8' foam board (2-each are cut in half lengthwise). Cost between $52 and $100 ($13 - $25 each) depending on R-value
- (Thin, untreated) plywood panels: 4-each 4'x8'. Cost $88 ($22/each)
- Plywood: 4-each 4'x8' (15/32-in) pressure treated plywood. Cost $148 ($37/each)
- Total cost: $288 (low R-value) to $336 (high R-value)
- Thermal storage (north wall): Dimensions 4' x 16' x 2'.
- 55-gallon steel drums: 8-each. Cost $160 ($20/each)
- Steel Hardware Cloth: Comes in 25-foot lengths, so 2-each 1/2-inch x 4 ft x 25 ft 19-Gauge. Cost $160 ($80/each)
- Total cost: $320.
- Compost frame: Dimensions 4'x4'x16'
- 10-each 6' T-posts. Cost $60 ($6/each)
- Chicken wire: Need 36-feet length, but comes in 25-foot lengths, so 2-each. Cost $60 ($30/each)
- Total cost: $$120
- Grand total: You must add tax and any shipping costs to the numbers below.
- Low-end: $1,462 (i.e. 530 + 204 + 288 + 320 + 120)
- High-end: $1,510 (i.e. 530 + 204 + 336 + 320 + 120)
Useful calculations
- Blue Rhino Propane Tank. A 20-pound cannister holds 4.7 gallons of propane and 433,000 BTU. One gallon of propane holds 92K BTU.
- BTU computed by weight. One BTU is the change of one degree F of one pound of water. Since one gallon of water weighs 8.33 pounds, then one gallon of water holds 8.33 BTU per one degree F change.
- BTU computed by volume. Water can hold 62 BTU per cubic foot, per one degree F change.
- 55-gallon drum. Has a capacity of 7.35 gallons. If filled with water, it can hold 458.15 BTU per one degree Fahrenheit change (i.e. 8.33 BTU water x 55 gallons). If raised 15 degrees then 6,872.25 BTU increase. Eight drums (i.e. 440 gallons) filled with water would hold 54,978 BTU (or 55k BTU rounded).
- Greenhouse volume. A 12' x 32 semi-circle greenhouse holds 1,808 cubic feet (i.e. 56.5' area x 32' length).
- Passive thermal mass needed: Rule of thumb, take greenhouse square footage and multiply by 2.5 to get the number of gallons needed. Example: My 32'x14' greenhouse has 448 sqft x 2.5 equals 1,120 gallons of water. Of course, this assumes the only heating comes from ambient air in the greenhouse during the day.
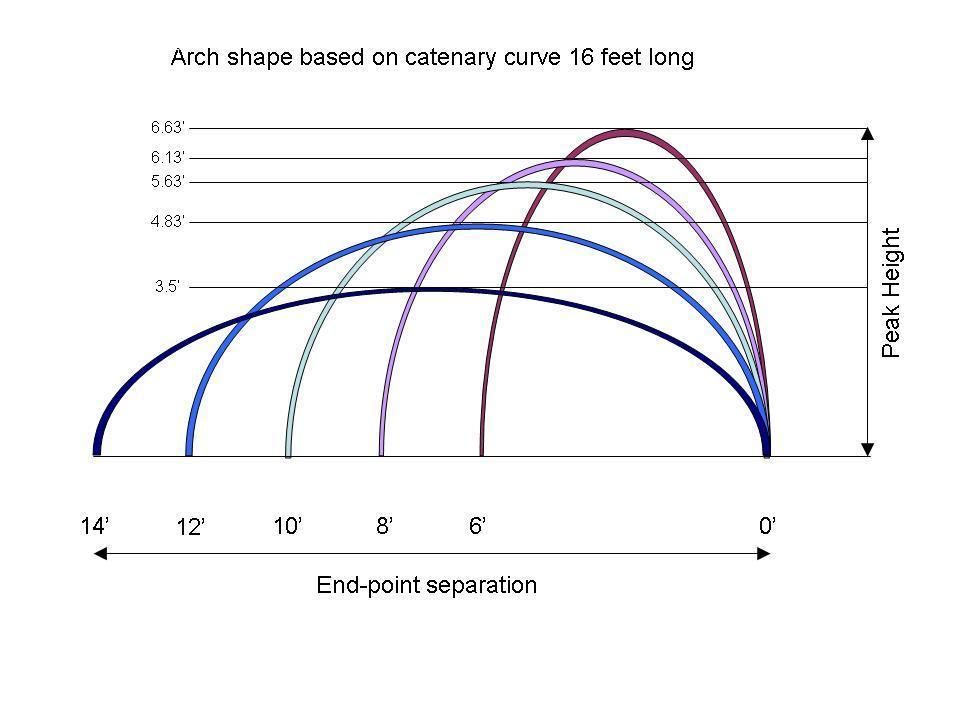
- Arch trellis - using 16' long cattle panel. Arch width and height based on catenary curve 16' long:
- 6' x 6.63'
- 8' x 6.13'
- 10' x 5.63'
- 12' x 4.83'
- 14' x 3.5'
Greenhouse Plastic Covering + Shade Cloth
- Agtec Super Strength Clear Woven Greenhouse Film 12mil. RPE (reinforced polyethylene), UV Stabilized, retains 80% strength after 7 years, 82% light transmission. For a 32' x 16' coverage the cost is approximately $150 + shipping.
- Solexx Greenhouse Rolls. Strong, twin-wall sheeting, diffused light, 10 year warranty, 50" wide (49.5" actual), 3.5mm thickness for maximum light transmission, 2.1 R-value. Shipping is $133 for up to 85 feet. For a 32' x 16' coverage the cost would be over $1,100 + shipping.
- Palram polycarbonate coverings. Is one of the two manufacturers in the United States of polycarbonate coverings. All others rebrand from them.
- Easy End Walls (Caterpillar Tunnel). Duration 12:33. He calls them scissor doors. Basically, he uses two steel fence posts that swing from the top center end of the greenhouse.
- How to Install Scissor Doors on a Caterpillar Tunnel. Duration 23:40. Detailed description and materials.
- Scissor doors:
 - Everbilt 1-3/8 in. Dia x 10 ft. 6 in. L 17-Gauge Galvanized Metal Top Rail Chain Link Fence Post. At Lowes or HomeDepot. Or use the 1-5/8 in. size which is the next size up.
- Greenhouse End Wall Brackets. Duration 7:34. The brackets sold at The Greenhouse Company of South Carolina.
- ShadeClothStore.com. Sells aluminet shade cloth, which is the best but 2-3 times more expensive. Lasts about 4 years.
- WindScreenSupplyCo. Sells rolls of shade cloth (non-aluminet) on Amazon for cheap.
Greenhouse Wall/Insulation Materials
- Plywood/OSB.
- Insulation materials. Use one of follow: Insulation panels or Roll insulation or Reflectix (?).
- Insulation panels. Need 3 panels of one of the following:
- Johns Manville ($25+). Johns Manville R- 9.3, 1.5-in x 4-ft x 8-ft AP Foil Faced Polyisocyanurate Foam Board Insulation. Can be cut with a utility knife. Low permeability: Ideal for controlling condensation in walls.
- Johns Manville ($11+). Johns Manville R- 2.7, 0.5-in x 4-ft x 8-ft AP Foil Faced Polyisocyanurate Foam Board Insulation.
- Dow Styrofoam ($14+). Dow R- 4, 0.78-in x 8-ft x 4-ft Residential Sheathing Faced Polystyrene Garage Door Foam Board Insulation with Sound Barrier.
- Roll insulation. You could also use roll insulation which has a greater insulation R-value and will cost about the same.
- Owens Corning ($18). Owens Corning R-13 Single Faced Fiberglass Roll Insulation (40-sq ft 15-in W x 32-ft L)
- Reflectix (?). Not sure if this attic insulation would be appropriate for walls.
- Reflectix ($43+). Reflectix R-21 Attic Wall Unfaced Reflective Roll Insulation (100-sq ft 48-in W x 25-ft L)
- Reflectix ($24+). Reflectix R-21 Attic Wall Unfaced Reflective Roll Insulation (50-sq ft 24-in W x 25-ft L) Pallet
- Other:
- How To Insulate A Greenhouse. One of the best ways to insulate your greenhouse is to use bubble wrap because it's cheap, simple, and efficient. Other ways to insulate a greenhouse include thermal insulation foil & polyethylene plastic. Besides insulation, you can add heat to your greenhouse using compost, heat lamps, space heaters, or adding thermal mass (jugs of water).
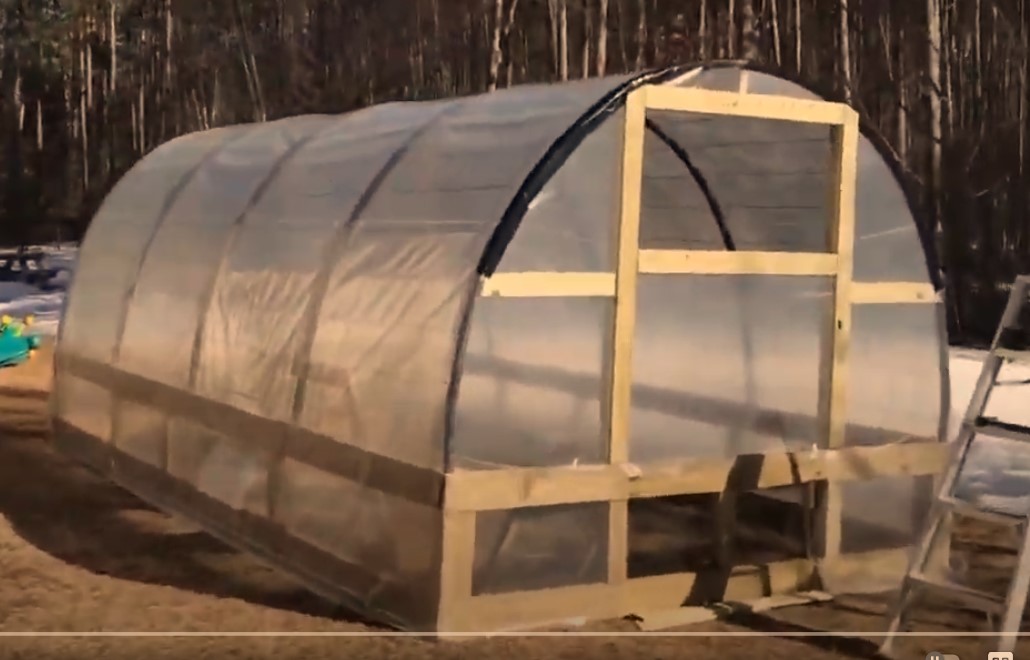
Cattle panel greenhouse
Greenhouse heating - wood, propane
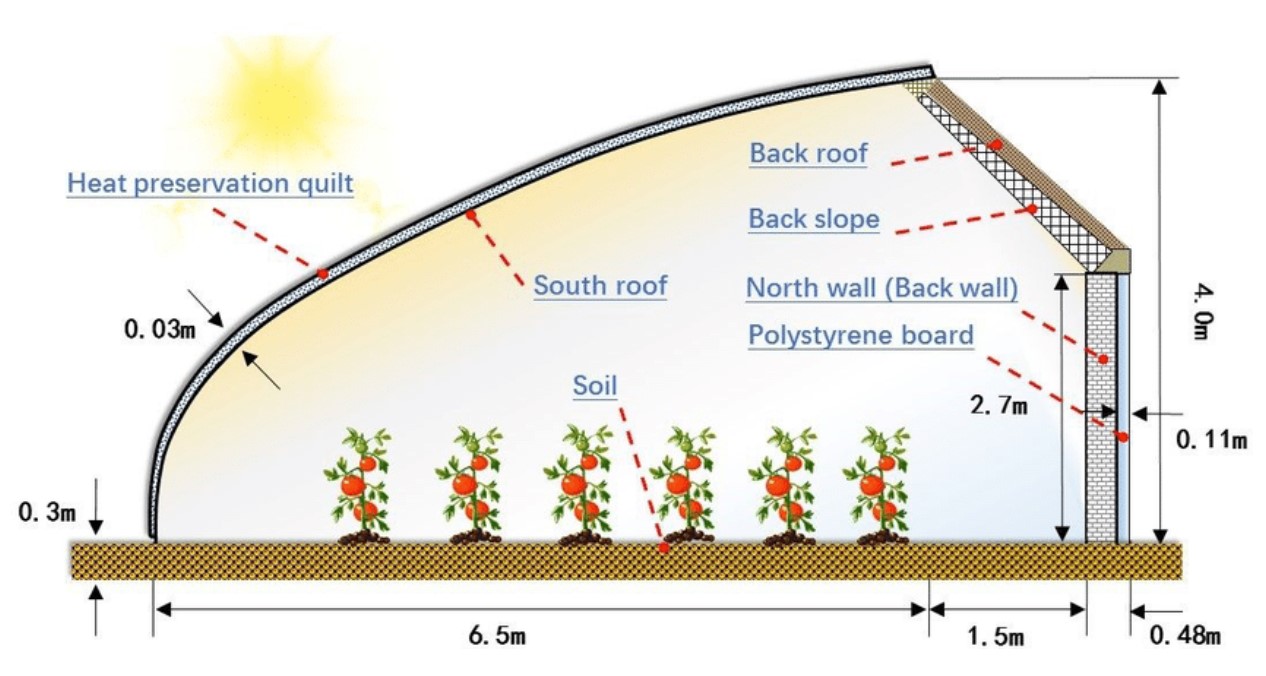
Solar Greenhouse - Heating/Cooling Ideas
Compost heating
- Description: Compost Aeration and Heat Recovery (CAHR). Industrial sized systems from Agrilab Technologies. Note that compost emits a lot of gases that you don't want inside the greenhouse; therefore, do NOT build a compost pile inside the greenhouse! Gases emits include: carbon dioxide, hydrogen sulfide, ammonia, nitrous oxide, methane, carbon disulfide.
- General ideas:
- Duct pipe. Run duct pipe through the compost pile. The pipe comes in from the bottom into the middle of the compost pile and returns near the top.
- Compost bioreactor:
 - Build and maintenance of compost pile:
- Build 4ft x 4ft x 4ft chicken wire bins.
- Mix browns and greens and add soil to jump start the bacteria from the soil.
- The pile should be loose. A compacted pile will slow down the composting process.
- Winter Compost: Why, and how you turn compost in the winter Duration 9:43. Needs to be moist but not too wet or it stops the composting process. Need to protect from rain with a corrugated steel roof and drying out with burlap cover on top of the pile itself. Compost should be turned every 3-4 weeks or so to maintain composting. Don't want compost pile to be hit directly by sunlight because it will dry out too fast.
- What I envision.
- Build a compost pile adjacent to the greenhouse.
- Coil 4inch corrugated performatted pipe(s) along the bottom of the compost pile and feed into the greenhouse.
Thermal (or Climate) Battery System (underground)
- Description: Thermal (or climate) battery systems for a passive solar system. Typically, a sink hole is dug 4-5 ft deep and a (4inch perforated) piping circuit is installed at the lower level and another at about 2 ft below grade. Then a venting system using two fans (for the 2 piping circuits) are installed to circulate the air from the greenhouse down to the ground and back. The fans are set up to run (in the same direction) when the temperature drops below 50F and when it exceeds 75F.
- Expectations: A well-designed thermal battery system should keep the air temperature of the greenhouse above 40F even in the coldest part of winter.
- Videos:
- Videos (miscellaneous):
- What I envision. For zone 7a.
- Sink hole dimensions. 20ft by 16ft by 4ft deep. Create a separate sink hole (not under the greenhouse) which is easier to create, especially with an existing greenhouse.
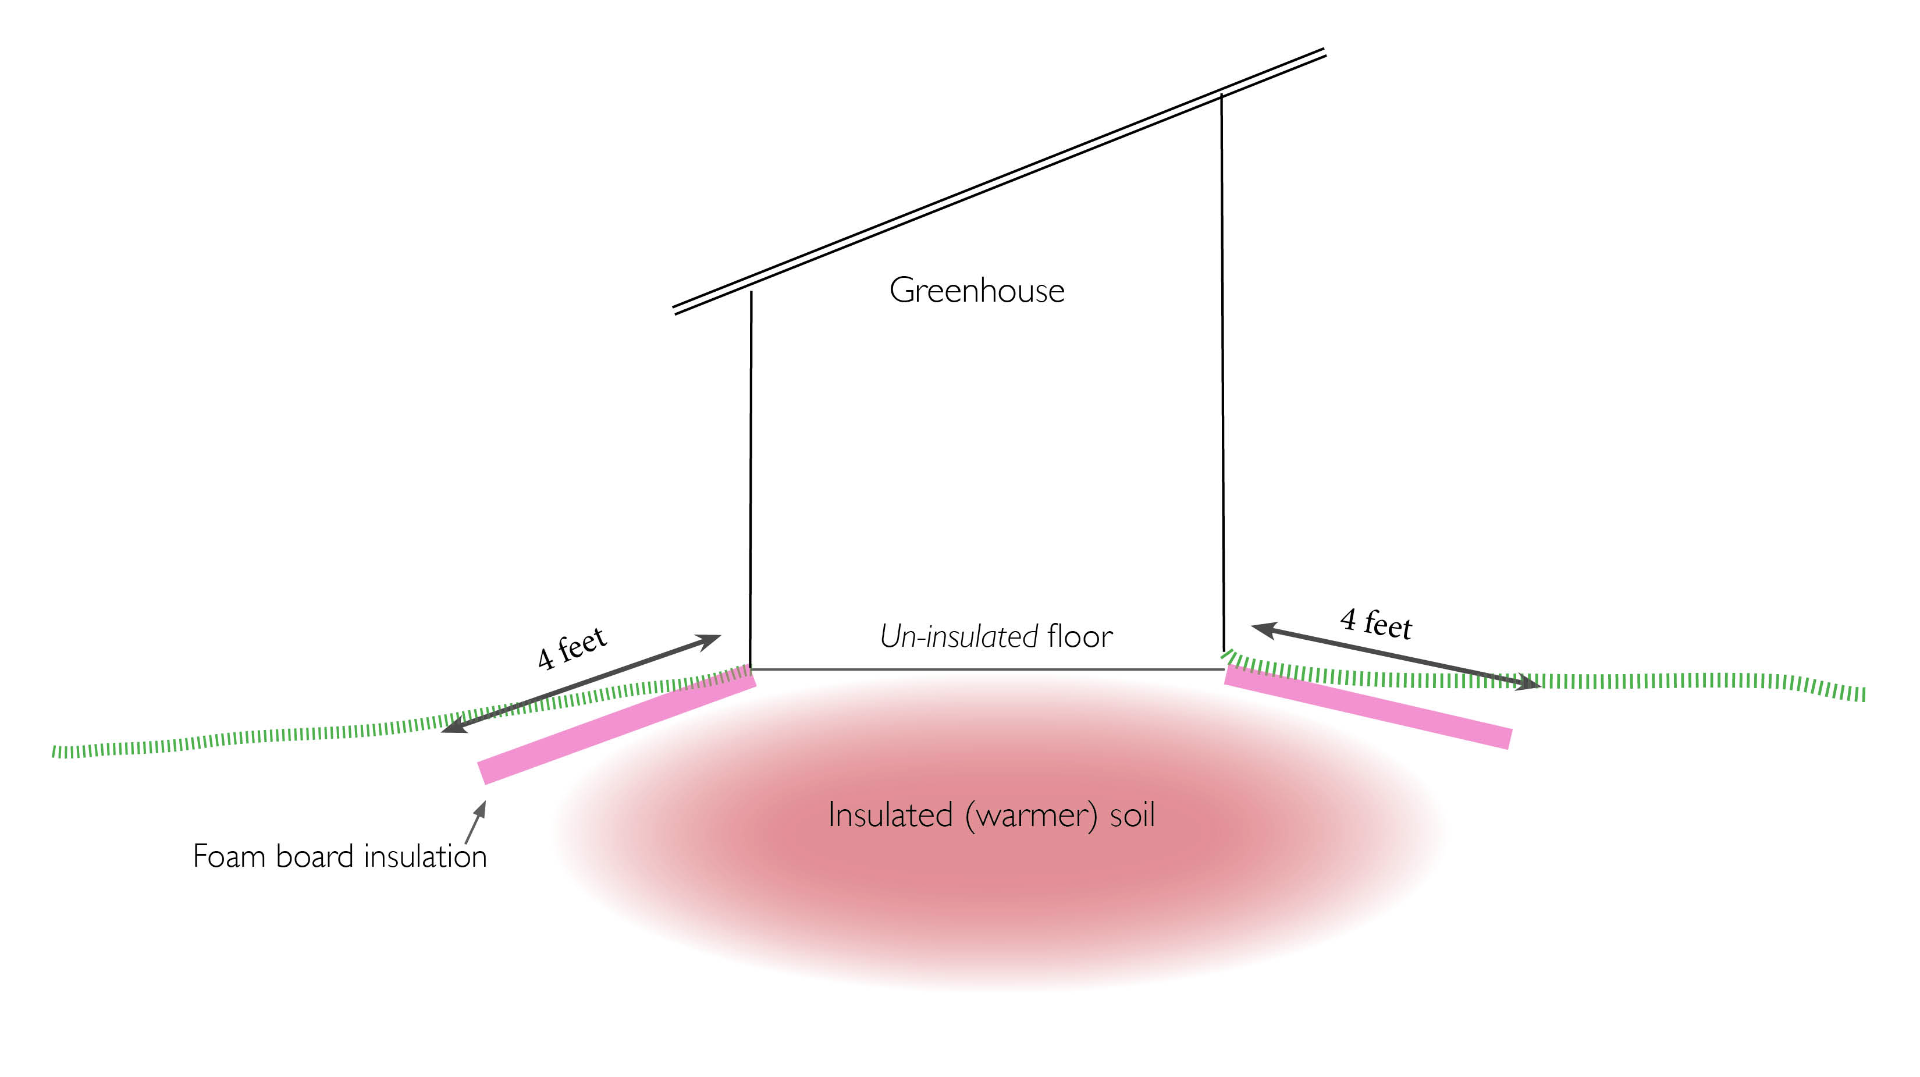
- Insulation. Insulate with 2-4inch of (polystyrene foamboard) insulation all around vertically, and (optionally) put a 2ft skirt (angled down) at the bottom around the periphery. For zone 7a, 2inch insulation without the skirt should be adequate. It is unnecessary to build a concrete wall or cinder block wall around the periphery, although it will not hurt since it adds volume to the battery. Make sure that the foamboard sits outside the concrete all if you have one.
- Pipes. Use corrugated drainage pipes. Two levels of piping, at 4ft and at 2ft. Use 4inch perforated for horizontal and connect to 6 inch non-perforated (preferably 8inch if you can find them) for the "manifold" and vertical piping. Wrap the perforated 4inch pipes with drainage rock and a geotextile fabric wrap.
- Piping (horizontal). Horizontal pipes should be spaced 16-24inch on center, where 16inch on center will result in double the heat exchange rate compared to 24inch. This is especially beneficial in winter when there is shorter daylight time to heat the battery. Note: The trade-off to close tubes (i.e. 16inch on center) is that there is less thermal mass to store the heat. You can also increase the fan speed to increase the heat exchange--for example, a flow rate of 200 CFM doubles the heat exchange compared to 50 CFM, all else being equal. Horizontal length of 15ft+- for each 4inch pipe is good, but longer is inefficient and wastes battery volume.
- Piping. Join the horizontal pieces at the ends to a 6inch horizontal pipe (manifold) which at the end goes 90 degrees vertical to above ground. Each layer (4ft and 2ft) will have one inlet and one outlet vertical pipe. The inlet (receiving the hot air and blowis it down into the tubes) should be at around 4ft above ground. At higher level the air is actually a degree or two colder.
- Pipe length requirements. Compute length of piping by 10-15% of cubic space of the greenhouse. A 30'x10' greenhouse has approximately 1200 cu. ft, so 10-15% of that is 120 - 180 ft of piping to comfortably heat the greenhouse.
Rock (optional). Generally speaking, the added benefit of rock is not worth the cost, the difference is not that great. Use 2-4inch (septic/drain) rock if the soil is too clayish. Lay down 6inch of rock at the 4.5ft level. Lay the first layer of horizontal piping at the 4ft level. Then lay down another 2ft of rock and second layer of horizontal piping at the 2ft level. Add another 6inch of rock and a geotextile blanket over the top. Finally, fill the balance of the hole with dirt. Estimated amount of rock for a 30ft x 10ft x 36inch area is approximately 35 cubic yards or 50 tons. See Gravel Calculator. Cost per ton of drainage rock is $25 - $50, or a total of $1,250 - $2,500.- Fans. Using a Max Fan (6-10inch) or HVAC Fan. At 200 - 250 watts/hour or approximately 5,000 - 6,000 watts/day, the cost is $15-$18 per month ($0.10/kwh). To save on electricity, use a relay and two thermostats to turn on below 50F and above 75F. The greater the fan speed, the more the heat transfer. In the winter, faster fan speed helps store heat quicker. Then at night slow the fan speed to give off the heat slowly and uniformly through the night. Use a temperature controller thermostat which can be at Amazon and eBay.
- PVC Y Connector. Attach to top of vertical pipe so that a hose can be used to pump out the water in case of flooding.
- Vents. Also install vents on the greenhouse itself that automatically open at high temperatures.
- Heat storage capacity - is the amount of heat required to change the temperature of a volume of material by one degree. Higher number "holds" more heat energy. Measured in BTU / ft^3 (cubic feet) in Fahrenheit. (A 55-gallon drug holds 7.35 cubic feet.) As can be seen below, wet soil is preferable to drainage rock, although drainage rock will do better than dry soil. In humid or rainy climates there is no benefit to using rock and the added expense is unnecessary.
- Air - 0.018
- Dry soil - 15.
- Granite (rock) - 31.
- Concrete - 32.
- Wet soil - 39.
- Water - 62
Profitability of growing lettuce in a 3,000 sqft greenhouse
Using a rotation method in a 3,000 sqft greenhouse, a gardener can
produce approximately 750 heads of lettuce per week. The rotation
method involves each week starting 750 seeds in small trays (a 10"
by 20" tray can handle about 50 seeds) for the first 20 days
or so then transplanting the seedlings to the greenhouse for the final
30 days. The greenhouse is divided into 4 sections, where each section
is planted in weekly succession with 750 seedlings occupying 1 sqft
per lettuce. As the oldest section is harvested from the greenhouse,
it is immediately reseeded with the 20-day-old seedlings from the
small trays.
An average grocer will typically purchase 600 - 800 heads of lettuce
per week. Therefore, one gardener can service one store. If sold to
the grocer at $1.00 per head (usually shipped in 24-count lettuce
cases, or approximately 30 boxes per week), the gardener can generate
close to $40,000 per year.
Profitability of growing tomatoes in a greenhouse
Sunizona
Family Farms claims to net (as of 2010) approximately $15/sqft/year
from growing tomatoes inside their commercial greenhouse. Thus, a
3,000 sqft greenhouse should be able to generate approximately $45,000
per year.
They use bumblebees to pollinate the tomato plants. One hive, costing
about $150, will last approximately 2 months and can pollinate 5,000
sqft. See Arbico
Organics to purchase hives.
ClimaPod Greenhouse Kits
Harbor Freight Portable Garage to Greenhouse
Bootstrap Farmer DIY Greenhouse Kits
- Build a Greenhouse: Bootstrap Farmer High Tunnel Kit. Duration 42:40.
- Bootstrap Farmer: DIY Greenhouse Kit - 10 Ft Wide (8.5 Height) Hoop House. Under $500. Comes with
- 6 mil Greenhouse Plastic - roughly a $200 value
- Wiggle Wire Kit - roughly a $50 value
- Ground Post Driver - valued at $30
- Cross Connectors
- Nuts, Bolts, Screws and Connectors
- a 10x30 greenhouse.
- Bootstrap Farmer: DIY High Tunnel Plans.
- Ibid. However, you will need to also purchase the following:
- Top Rail Poles (1-3/8 in x 10 ft. 6 in. 17-Gauge Galvanized) - approximately $18 (tax included) per pole from either Lowes or HomeDepot. For a 30 ft greenhouse it would take 18 poles or $360. The spacing would be 4 ft apart.
- Ground Posts (1-5/8 in x 8 ft) - approximately $20+. For a 30 ft greenhouse you will need 9 poles (or $180) pre-cut to 4 feet each for a total of 18 ground posts.
- Lumber - 2x8x8 or 1x8x8, for base boards and hip boards. Hip boards are usually placed at 36" from the top of the base boards. The wiggle wire is installed on the hip boards.
- Pole Bender - $97
- Build your own endwalls or buy theirs for $830.
- Landscape Fabric - 5 oz. Heavy Duty
- (Optional) Hoop House Roll Up Side Curtain Kit - $270
- (Optional) Shade Cloth
- Ibid. Total cost: You are looking at well over $1,000 for a 10x30 ft greenhouse, that's assuming you do the endwalls yourself.
Greenhouse links and notes:
More notes:
- Solar Greenhouse Design 101. Published 6/17/2019. Duration 1:17:11. Passive system.
- Daily Light Integral (DLI) maps. Daily light integral (DLI) is the amount of photosynthetically active radiation (PAR) received each day as a function of light intensity and duration. DLI maps display the ambient light delivered daily during each month across the entire United States. DLI interactive map.
- DLI for Tennesse by month: Jan:16.09, Feb:20.72, Mar: 29.22, Apr:37.02, May:42.38, Jun:45.87, Jul:42.96, Aug:41.29, Sep:34.19, Oct:25.85, Nov:19.11, Dec:14.45. Annual is 30.81. March is a good time to start the garden seeds. The end of October is the last of the growing cycle. The four months of November through February is the off season.
- Sun Master® 6 MIL 4 Year 55% Greenhouse Film. Copolymer tri-layer construction. 55% opacity keeps the light shining through. UV stabilized for up to four years of film life. Price for 24' x 110' is $377.10.
- Sun Master® Pull and Cut Greenhouse Film. Priced at $3.00/ft on 20' wide roll.
- Sun Selector Clear IR AD Greenhouse Film, 4 year 6mil. Cheaper still.
- How Double Layer Greenhouses Work. Published 11/4/2016. Duration 6:49. Blower uses little electricity. Greenhouse Inflation Blower Fans With Mount Brackets and Cords.
- How Our Winter Garden Survived -23°F (-31°C) With No Heat. Plants survived -23F winter day! He uses as much as 5 layers of greenhouse plastic.
- Garden Clips. Use these to secure the plastic to the pipes.
- (YouTube)
Eliot Coleman's Tomato Tips & How to Build a Greenhouse. Posted 9/22/2012. Great ideas for a simple greenhouse. Using 20 foot rebar with 12 foot width. The rebar is put inside electrical conduit and slipped into pipes buried in the ground.
- TexasPrepper's Greenhouse. Uses a set of cattle panels as the
frame.
- Build
A Better GREENHOUSE! Video costing $29.95. Uses piping.
- Hinges: 8 Ways To Make A Hinge With EMT Conduit! (Duration 6:46)
- T-Post Brackets: Use Fence and Lumber brackets together to build sheds, etc.
- French Drain Gravel Calculator. To estimate the cubic feet, yards, and tons of gravel needed for installation.
- Hoop House Pole Bender. Heavy-duty pole benders. The 4' and 6' are specially designed to work with 3/4" EMT. The 10', 12' and 20' are for 1-3/8" top rail steel poles. Greenhouse width and approximate height: 4' by 47", 6' by 4', 10' by 8.5', 12' by 8', 20' by 10.75'. Approximately, $100.
- Greenhouse Cross Connectors. For 1-3/8" top rail poles. Aproximately, $5.
|